So you’ve decided to renovate your bathroom. That’s great. But the very first question most Toronto homeowners ask is: where do I actually start? Between choosing tile, finding a contractor, setting a budget, and figuring out what stays and what goes, it can feel like there are a hundred decisions to make before a single wall gets touched.
This guide walks you through the entire bathroom renovation process from start to finish, based on how we approach every project at Bathroom Renos. Whether you’re updating a small guest bath or gutting a master ensuite, these steps will help you stay organized, avoid costly mistakes, and end up with a bathroom you love.
Step 1: Set a Realistic Budget
Everything starts with your budget. Before you look at a single tile sample or browse Pinterest boards, you need to know what you can realistically spend. In Toronto, a full bathroom renovation typically ranges from $15,000 to $35,000 depending on the size of the space, your material selections, and the scope of work.
A few things to keep in mind when setting your budget:
- Include everything. Your budget should cover demolition, plumbing, electrical, waterproofing, tile, vanity, toilet, fixtures, glass, paint, and labour. If a quote only covers “some” of these items, ask what’s missing.
- Add a 10-15% contingency. Older Toronto homes often reveal hidden surprises behind the walls, like outdated plumbing, water damage, or mould. A contingency fund prevents these discoveries from derailing your project.
- Know where to invest. Spend more on waterproofing, tile installation, and fixtures you use every day (shower valve, faucet). Save on items that are easy to swap later, like mirrors and towel bars.
Step 2: Define What You Want (and What You Need)
Before you start calling contractors, take some time to think about what you actually want from your new bathroom. This is the planning phase, and it’s one of the most important steps in the entire process.
Ask yourself these questions:
- Do you want to keep the bathtub, or would you prefer a walk-in shower?
- Is the current layout working, or do you want to move the toilet, vanity, or shower to different locations?
- How many people use this bathroom daily? Do you need double sinks?
- What style are you going for? Modern, transitional, classic, spa-like?
- Are there any accessibility needs to plan for now or in the future (grab bars, curbless shower, comfort-height toilet)?
Write down your must-haves versus your nice-to-haves. This list will guide every decision from here on out and help your contractor give you an accurate quote.
Step 3: Choose Your Materials Early
One of the biggest mistakes homeowners make is starting demolition before their materials are finalized. Tile can take 2 to 6 weeks to arrive. Custom vanities can take even longer. If your materials aren’t ordered before demo day, your project will stall and your timeline will stretch.
Here’s what you should be selecting during the planning phase:
- Tile: Floor tile, wall tile, shower tile, and any accent or mosaic tile. Bring samples home and look at them in your bathroom’s lighting before committing.
- Vanity and countertop: Decide on size, style (floating vs. freestanding), and countertop material (quartz, marble, porcelain). Measure your space carefully.
- Toilet: Standard two-piece, one-piece, wall-hung, or smart toilet. Consider comfort height if taller adults use the bathroom.
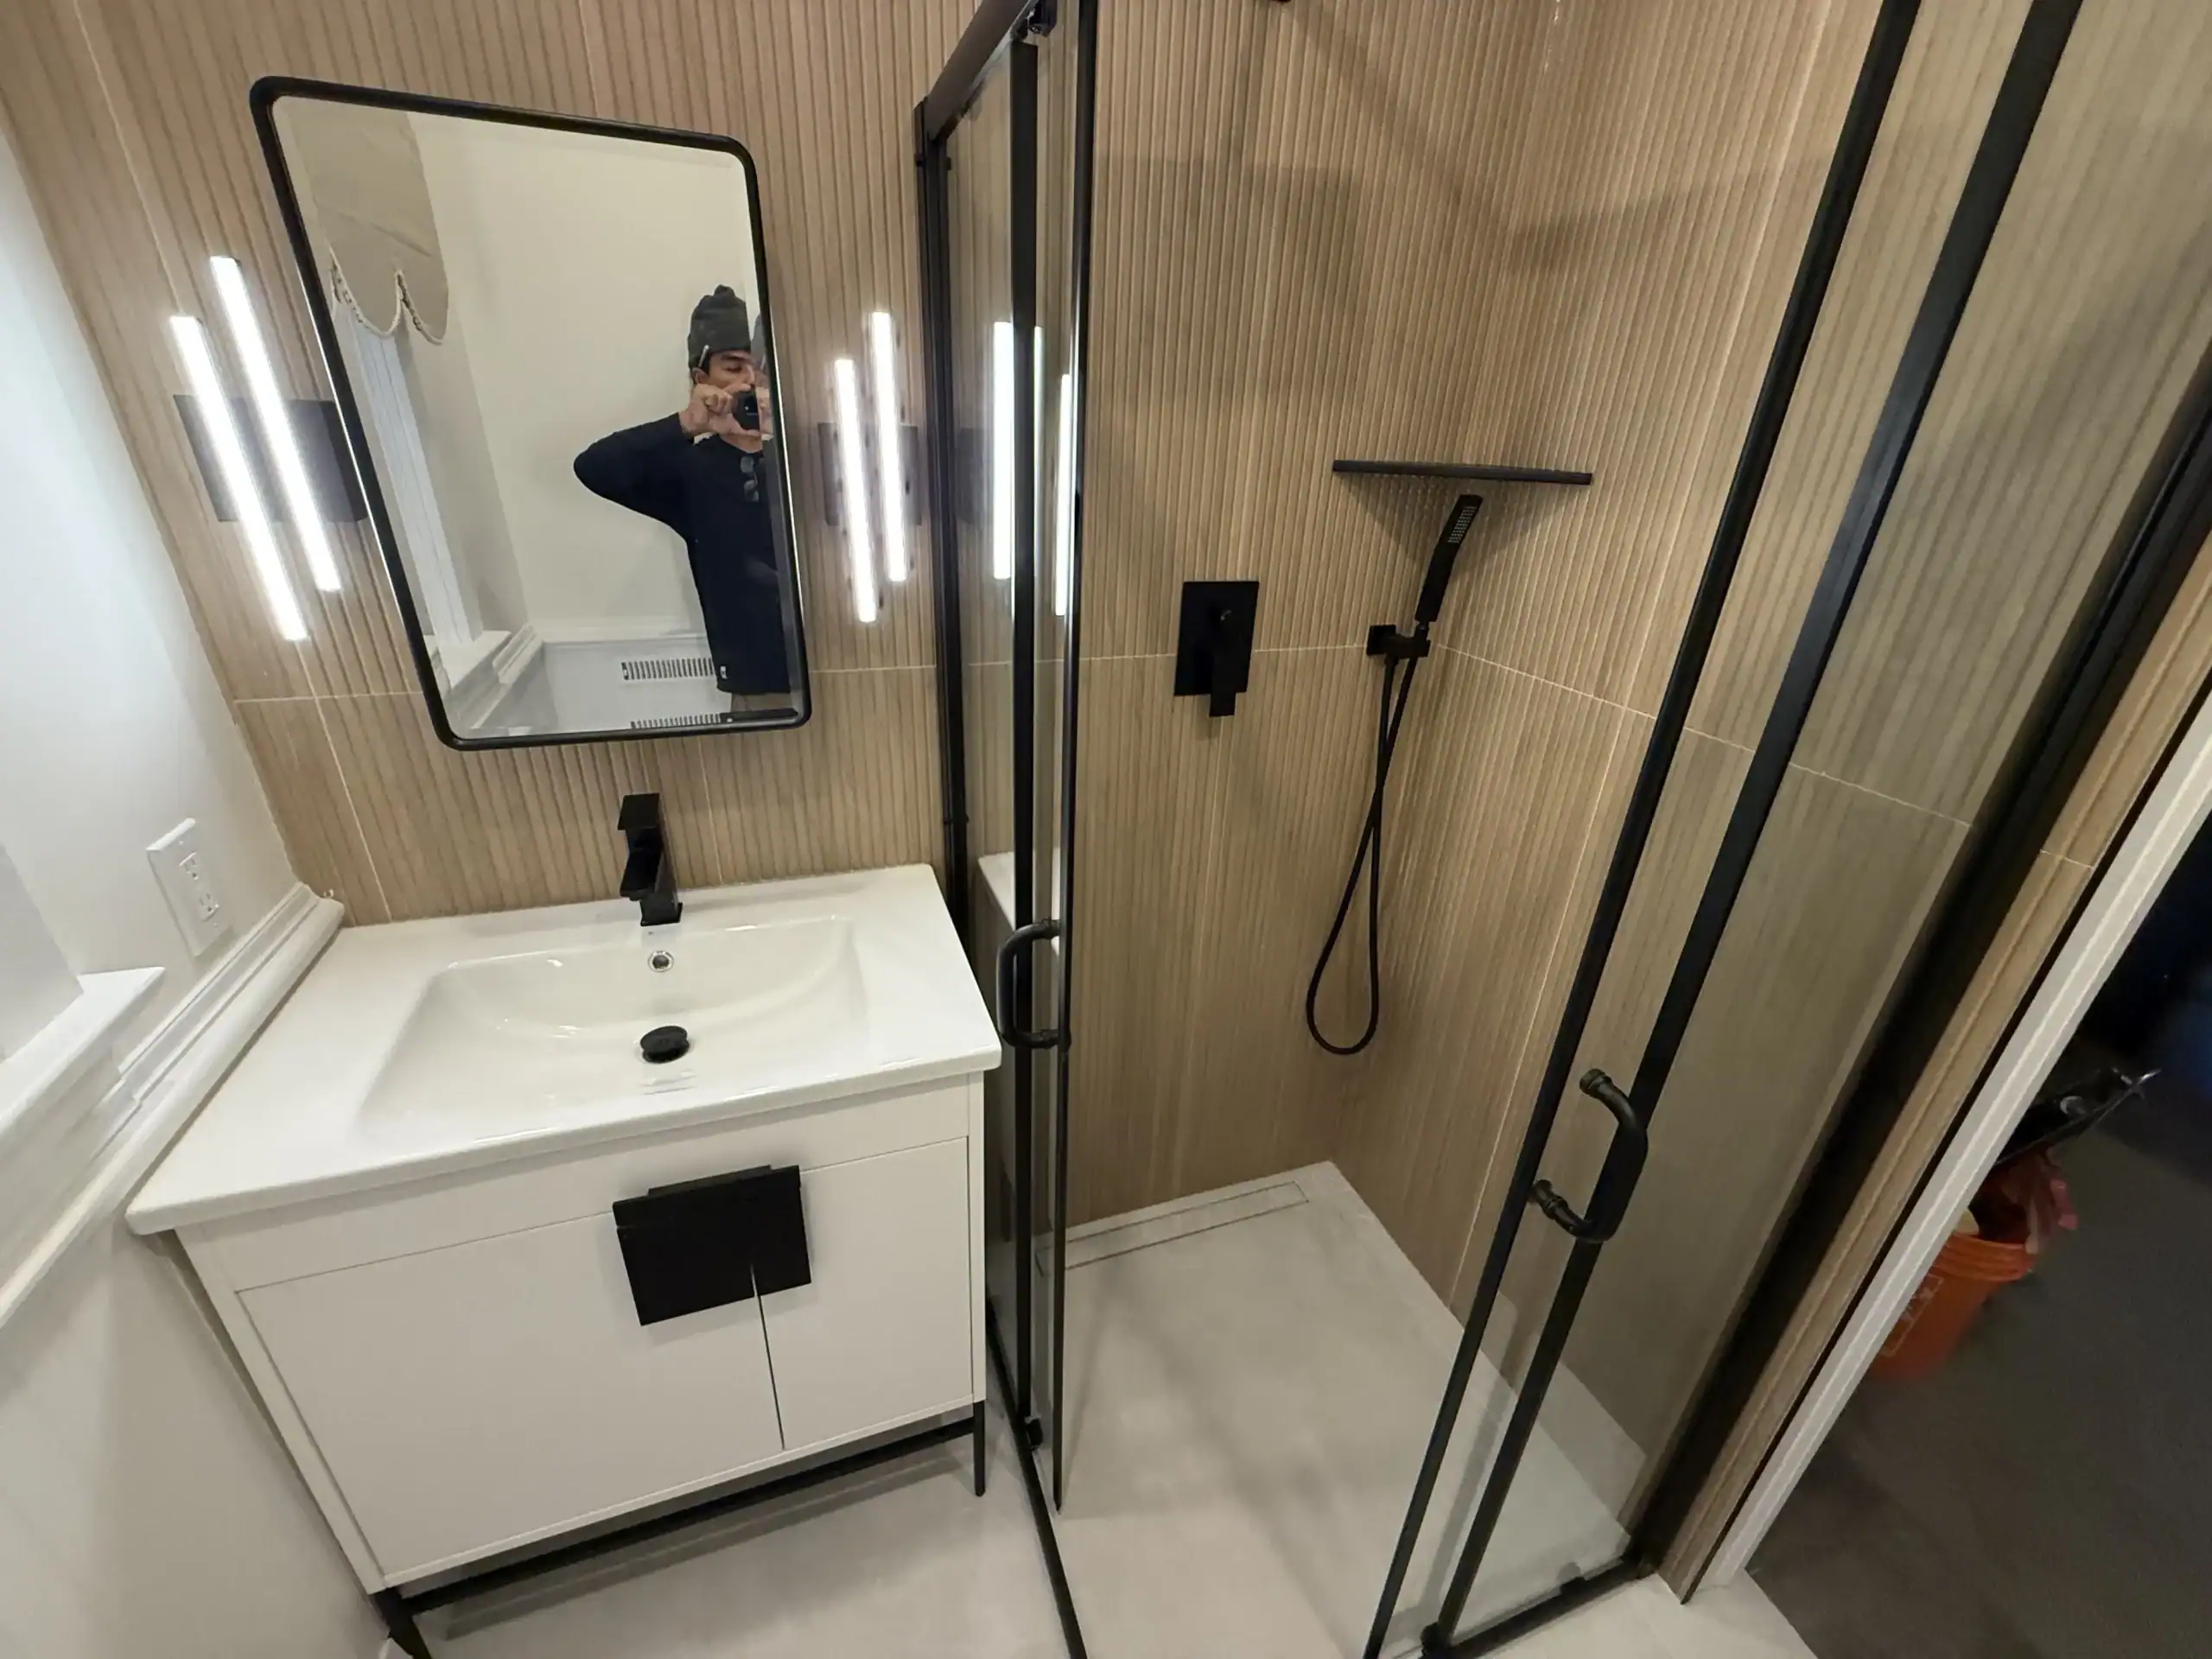
- Shower or tub fixtures: Rain shower, handheld, thermostatic valve, or a combination. Pick your finish (matte black, brushed nickel, brushed gold, chrome) and stick with it across all fixtures.
- Lighting: Vanity sconces or a light bar, pot lights in the shower area, and an exhaust fan with a built-in light.
At Bathroom Renos, we help our clients select materials that fit their budget and style during the quoting process, so everything is ready to go before we start.
Step 4: Find the Right Contractor
Your contractor will make or break your renovation experience. In Toronto, there’s no shortage of people willing to take on a bathroom project, but not all of them specialize in bathrooms, and not all of them do things the right way.
Here’s what to look for:
- Specialization. A contractor who focuses on bathroom renovations will know the details that generalists often miss, like proper waterproofing, tile layout planning, and plumbing code requirements.
- Portfolio of real work. Ask to see photos of completed projects. If every photo on their website looks like a stock image, that’s a red flag.
- Detailed written quote. A professional contractor provides a quote that breaks down every cost: demo, plumbing, electrical, tile, fixtures, labour. Vague quotes lead to surprise charges.
- Licensed trades. In Ontario, plumbing and electrical work must be performed by licensed tradespeople. Ask your contractor who handles these trades and whether they’re licensed.
- Reviews and references. Check Google Reviews, read what past clients say, and don’t be afraid to ask for references you can call.
Step 5: Demolition and Rough-In Work
Once your materials are ordered and your contractor is booked, demolition day arrives. This is where the old bathroom comes out and the rebuild begins.
During demolition, your contractor will:
- Remove the old vanity, toilet, tub or shower, and all tile from the floors and walls
- Strip the space down to the studs and subfloor
- Inspect for hidden issues like water damage, mould, or outdated plumbing
- Haul away all debris and dispose of it properly
After demo, the rough-in phase begins. This includes:
- Plumbing rough-in: Moving or replacing drain lines, supply lines, and shower valves. If you’re changing the layout (for example, converting a tub to a walk-in shower), this is when those changes happen.
- Electrical rough-in: Adding pot light boxes, relocating switches, running wire for heated floors, and installing a proper exhaust fan duct.
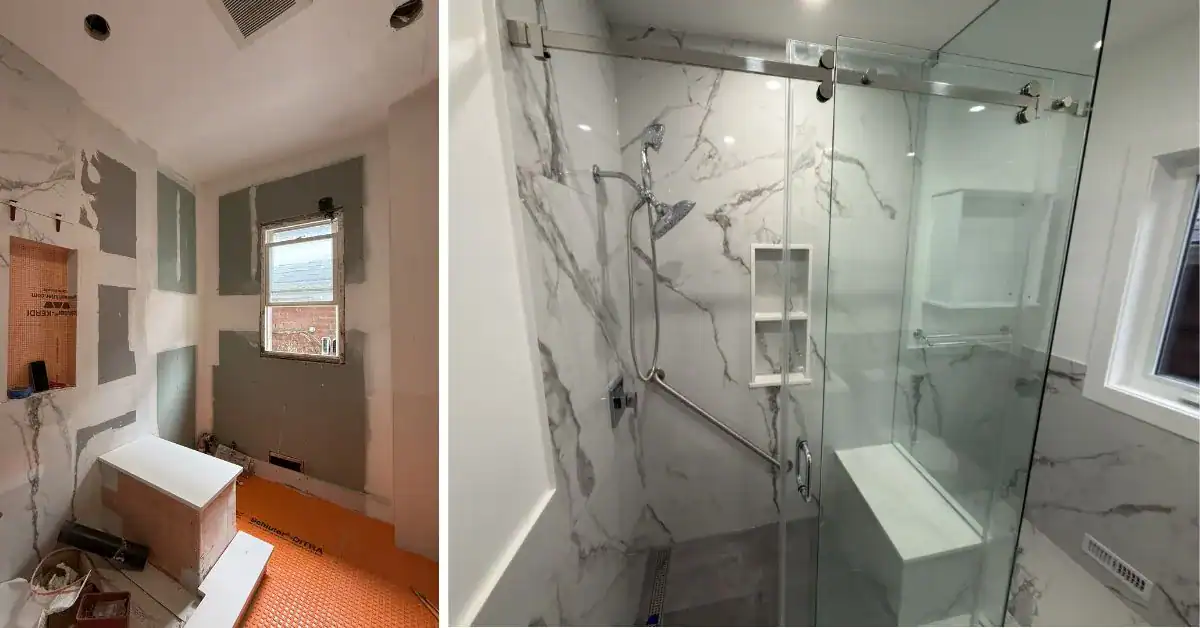
- Backer board installation: Cement backer board (like Kerdi Board or DensShield) goes up on the walls before any tile work begins. This provides a solid, moisture-resistant surface for tile installation.
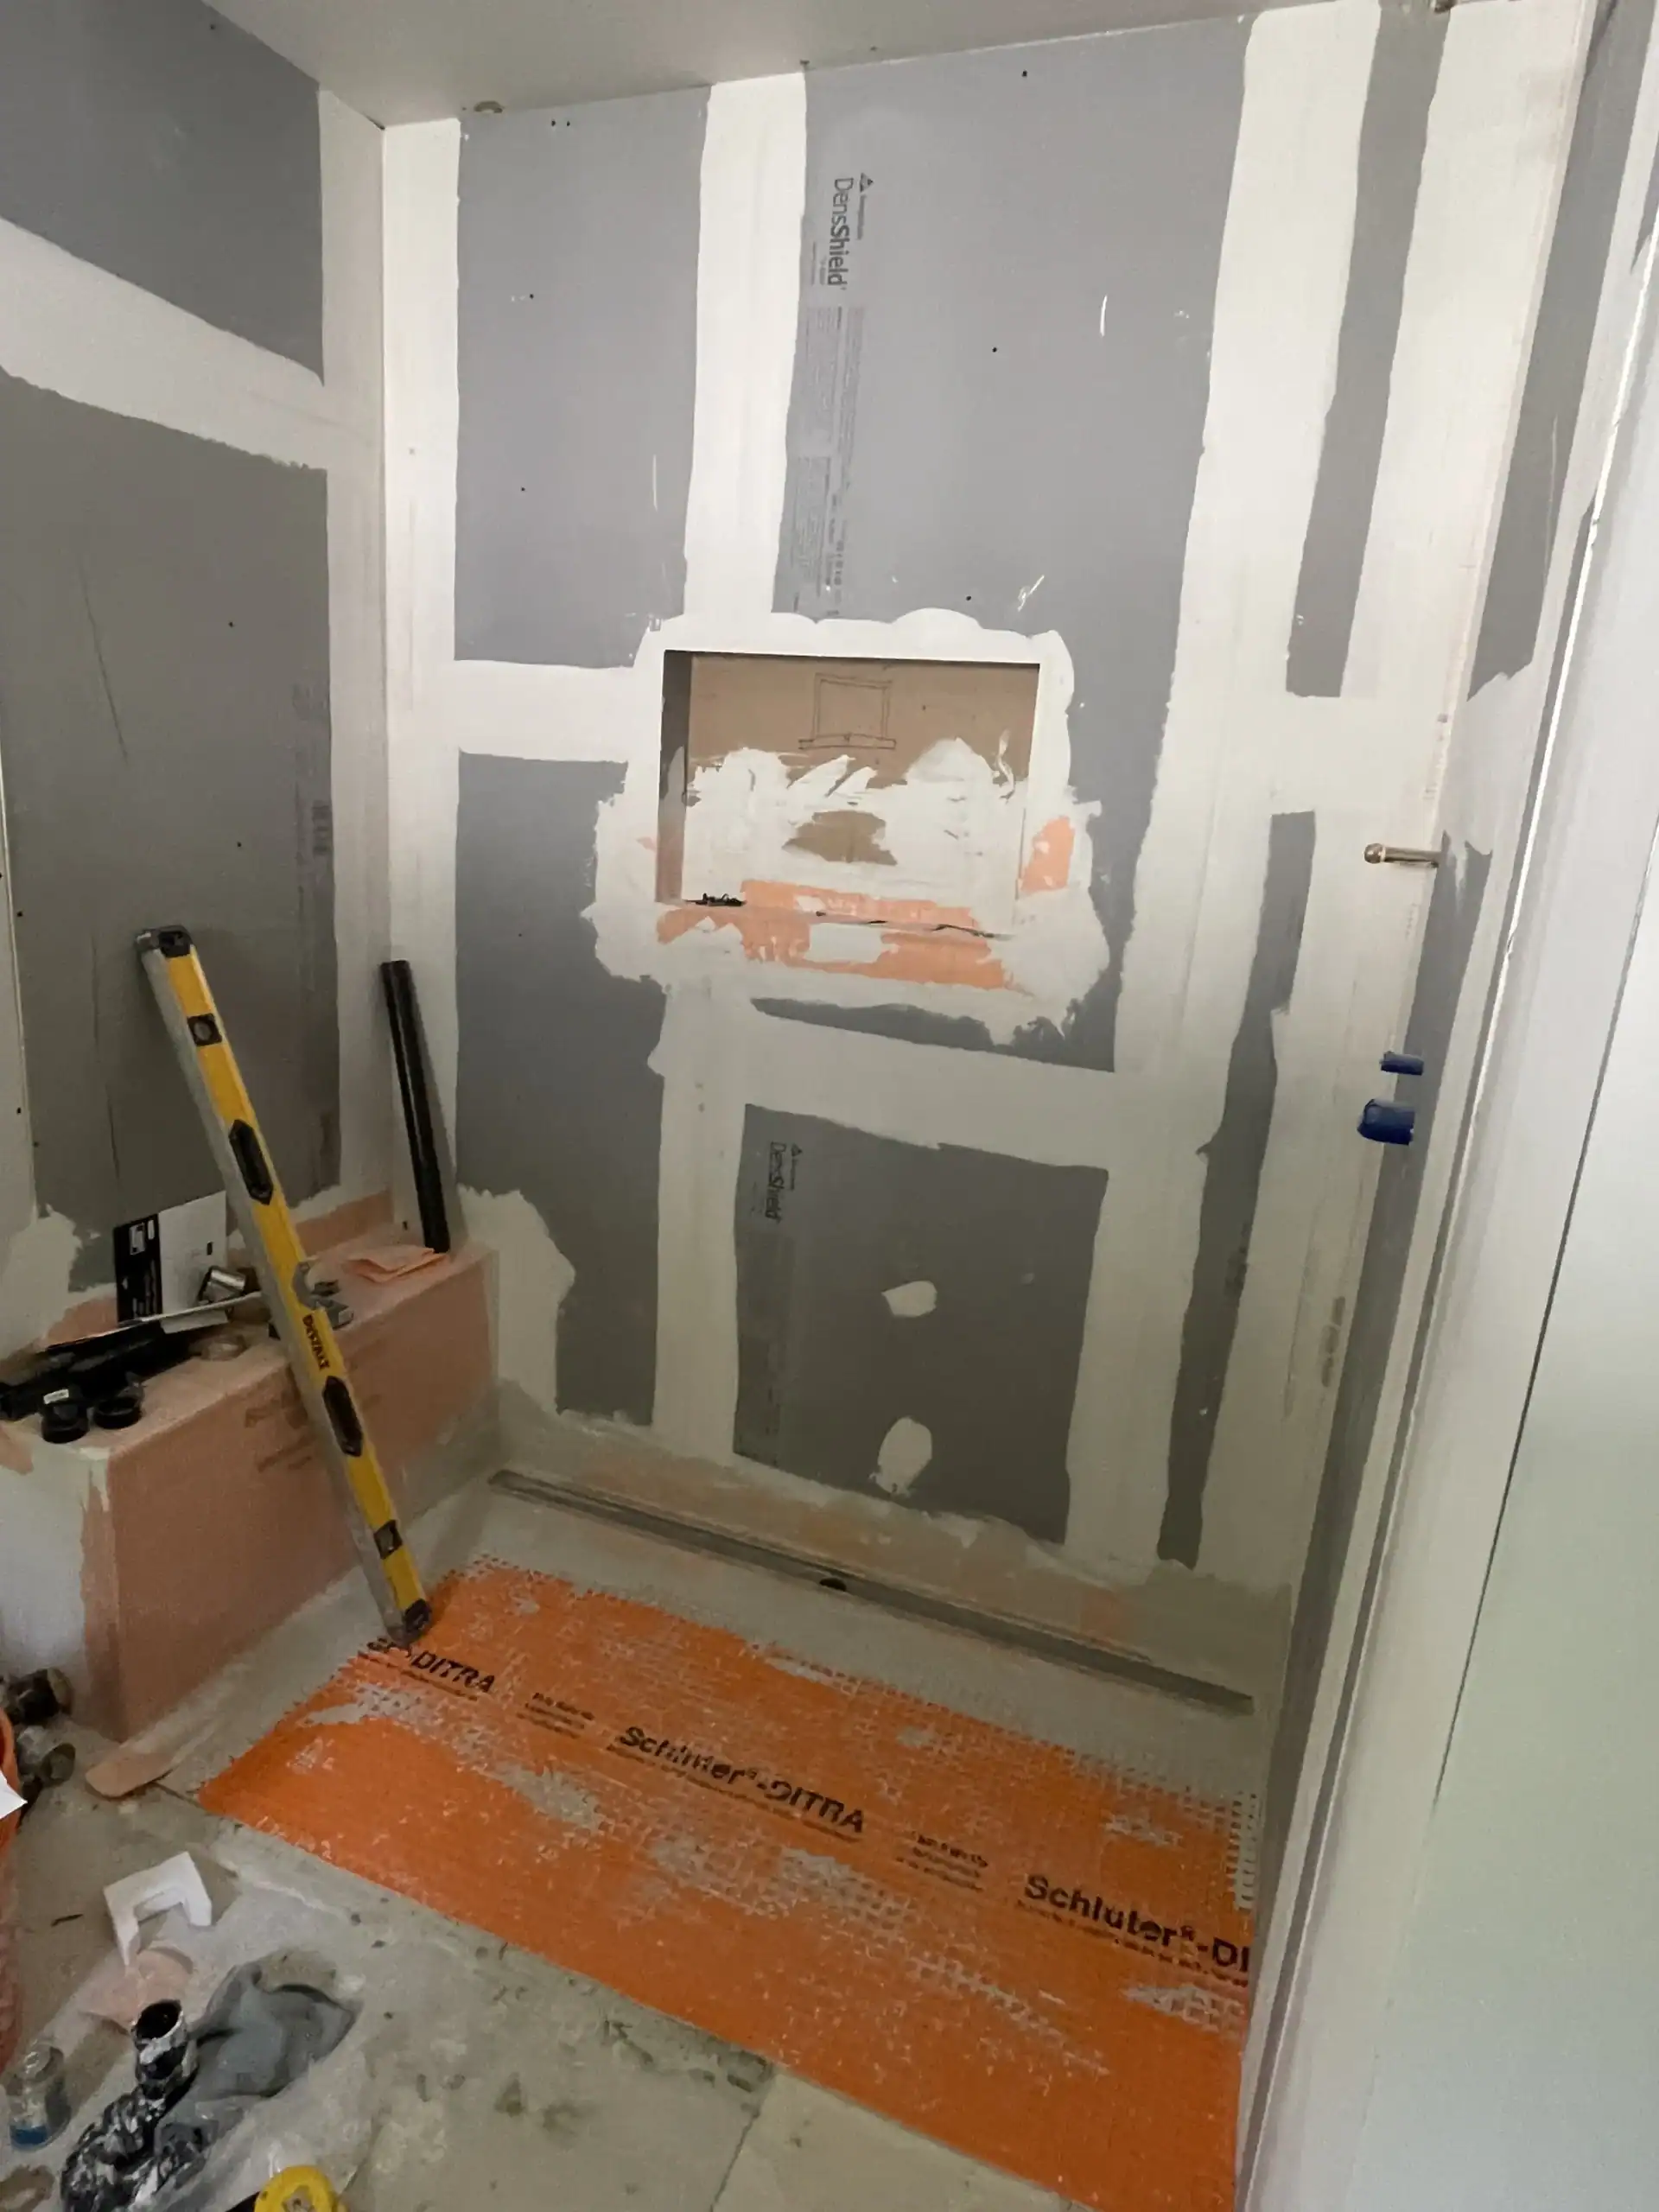
Step 6: Waterproofing (the Most Important Step Most People Don’t Know About)
This is the step that separates a quality bathroom renovation from one that will cause problems down the road. Waterproofing prevents moisture from reaching the wood framing behind your tile, which is what causes mould, rot, and structural damage over time.
At Bathroom Renos, we use Schluter KERDI membrane on all shower walls and Schluter DITRA on shower floors. These systems create a continuous waterproof barrier that protects your home for decades. We also waterproof around all penetrations (shower valve, showerhead, niches) and use Schluter KERDI-BAND at all seams and corners.
Some contractors skip waterproofing or use paint-on membranes that don’t provide the same level of protection. This is one area where cutting corners can cost you thousands in damage repairs within a few years. Always ask your contractor what waterproofing system they use and why.
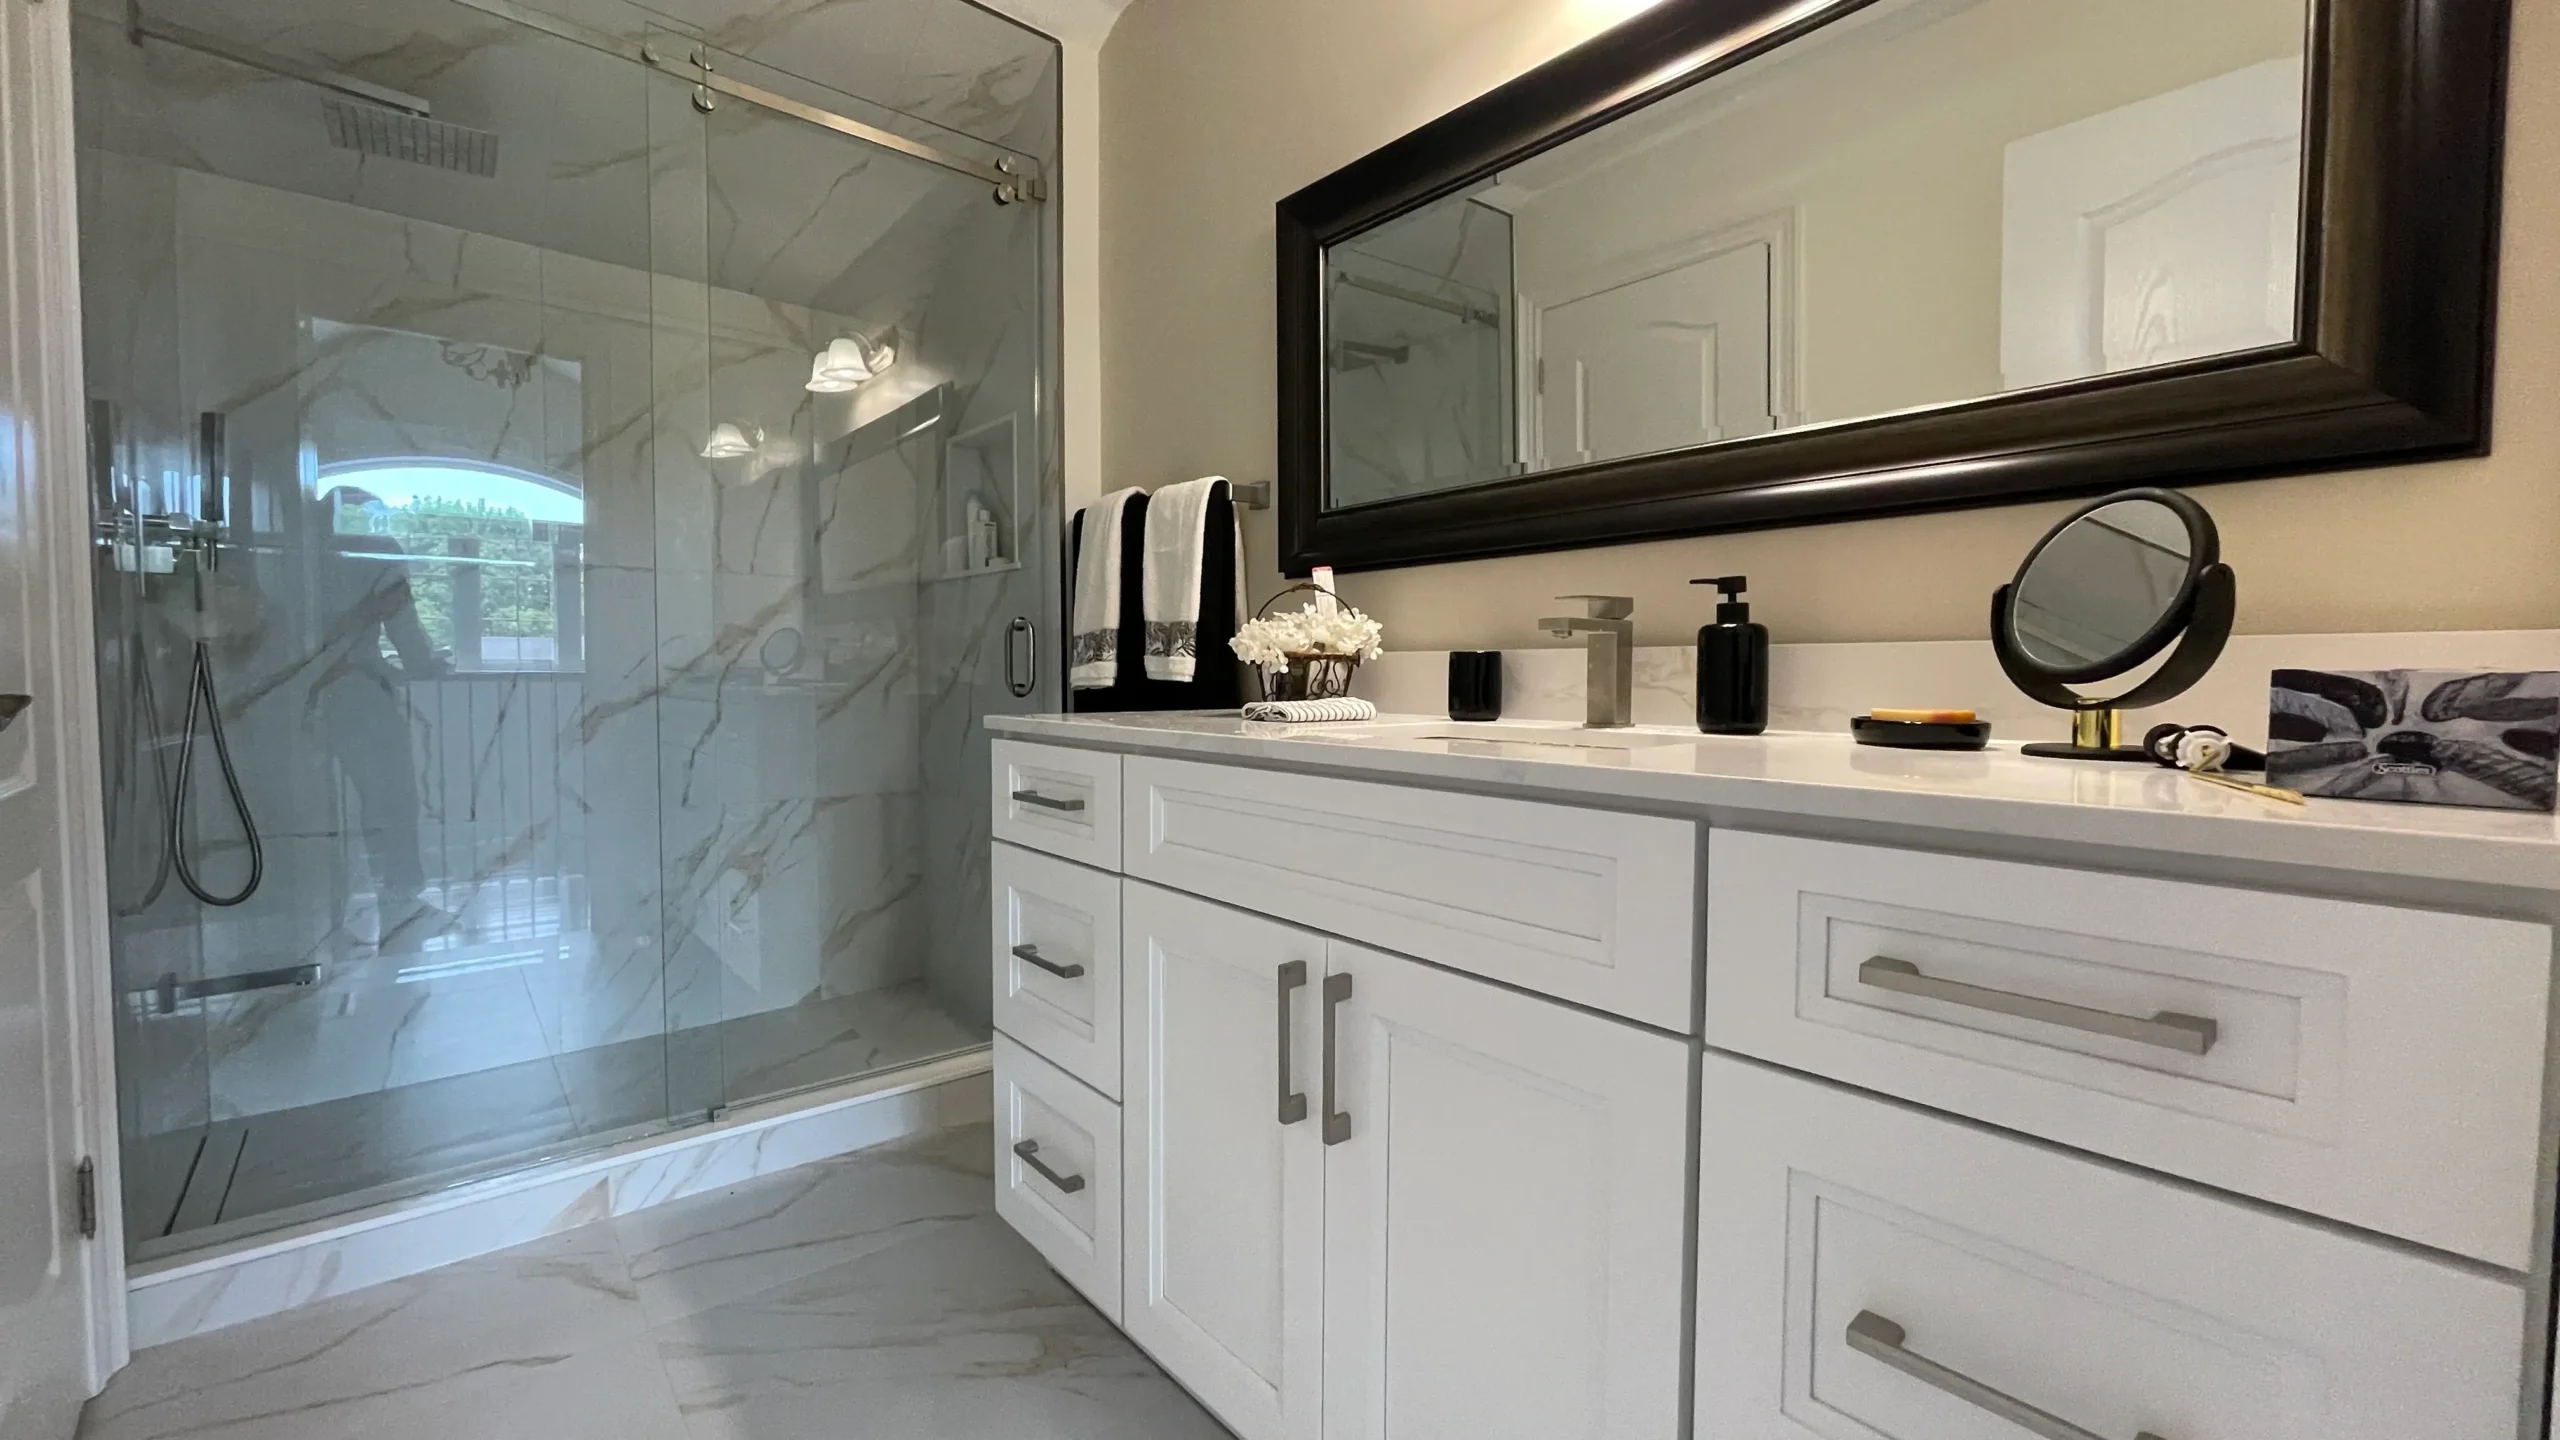
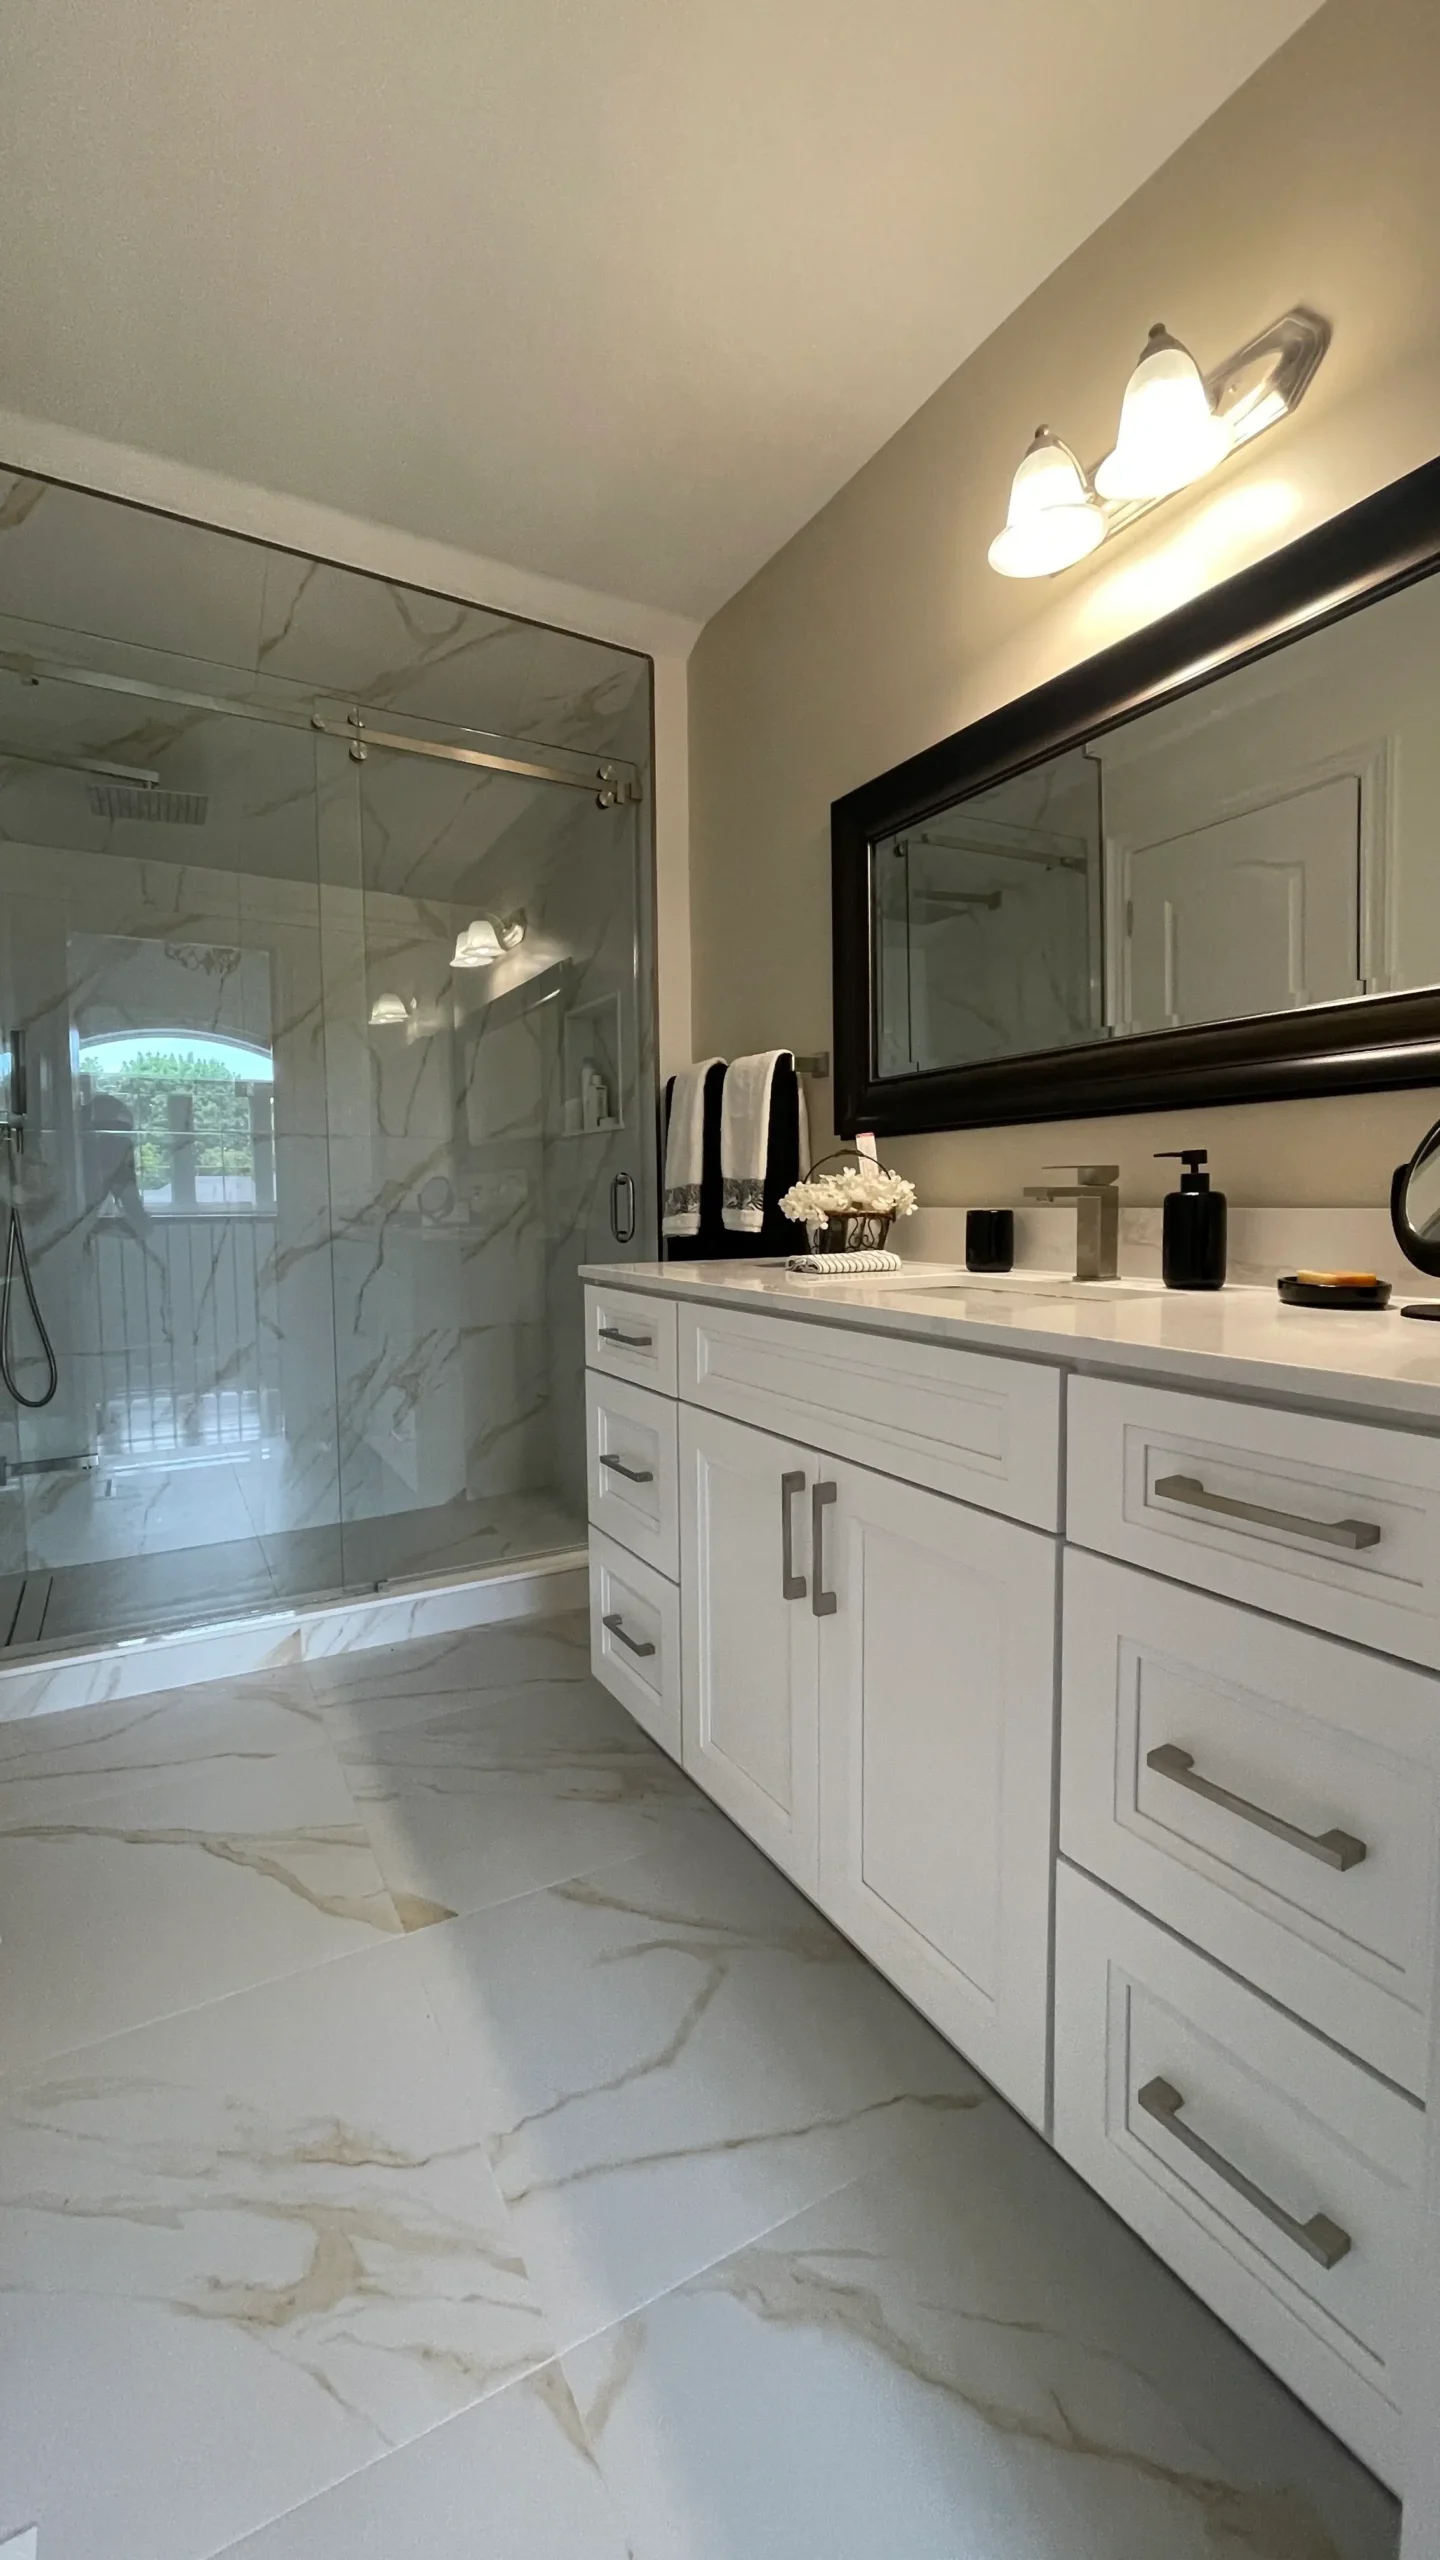
Step 7: Tile Installation
Tile is the centrepiece of your bathroom, and proper installation makes all the difference. A skilled tile installer will ensure consistent grout lines, level surfaces, and clean cuts around fixtures and edges.
Key considerations during the tiling phase:
- Layout planning: Before any tile goes on the wall, the installer should do a dry layout to ensure the pattern looks balanced. You don’t want a thin sliver of tile at the edge of a wall or an off-centre pattern behind the vanity.
- Large-format tile: Tiles in the 24×48 inch range are trending in 2026, and they look stunning. However, they require a perfectly flat substrate and careful handling during installation.
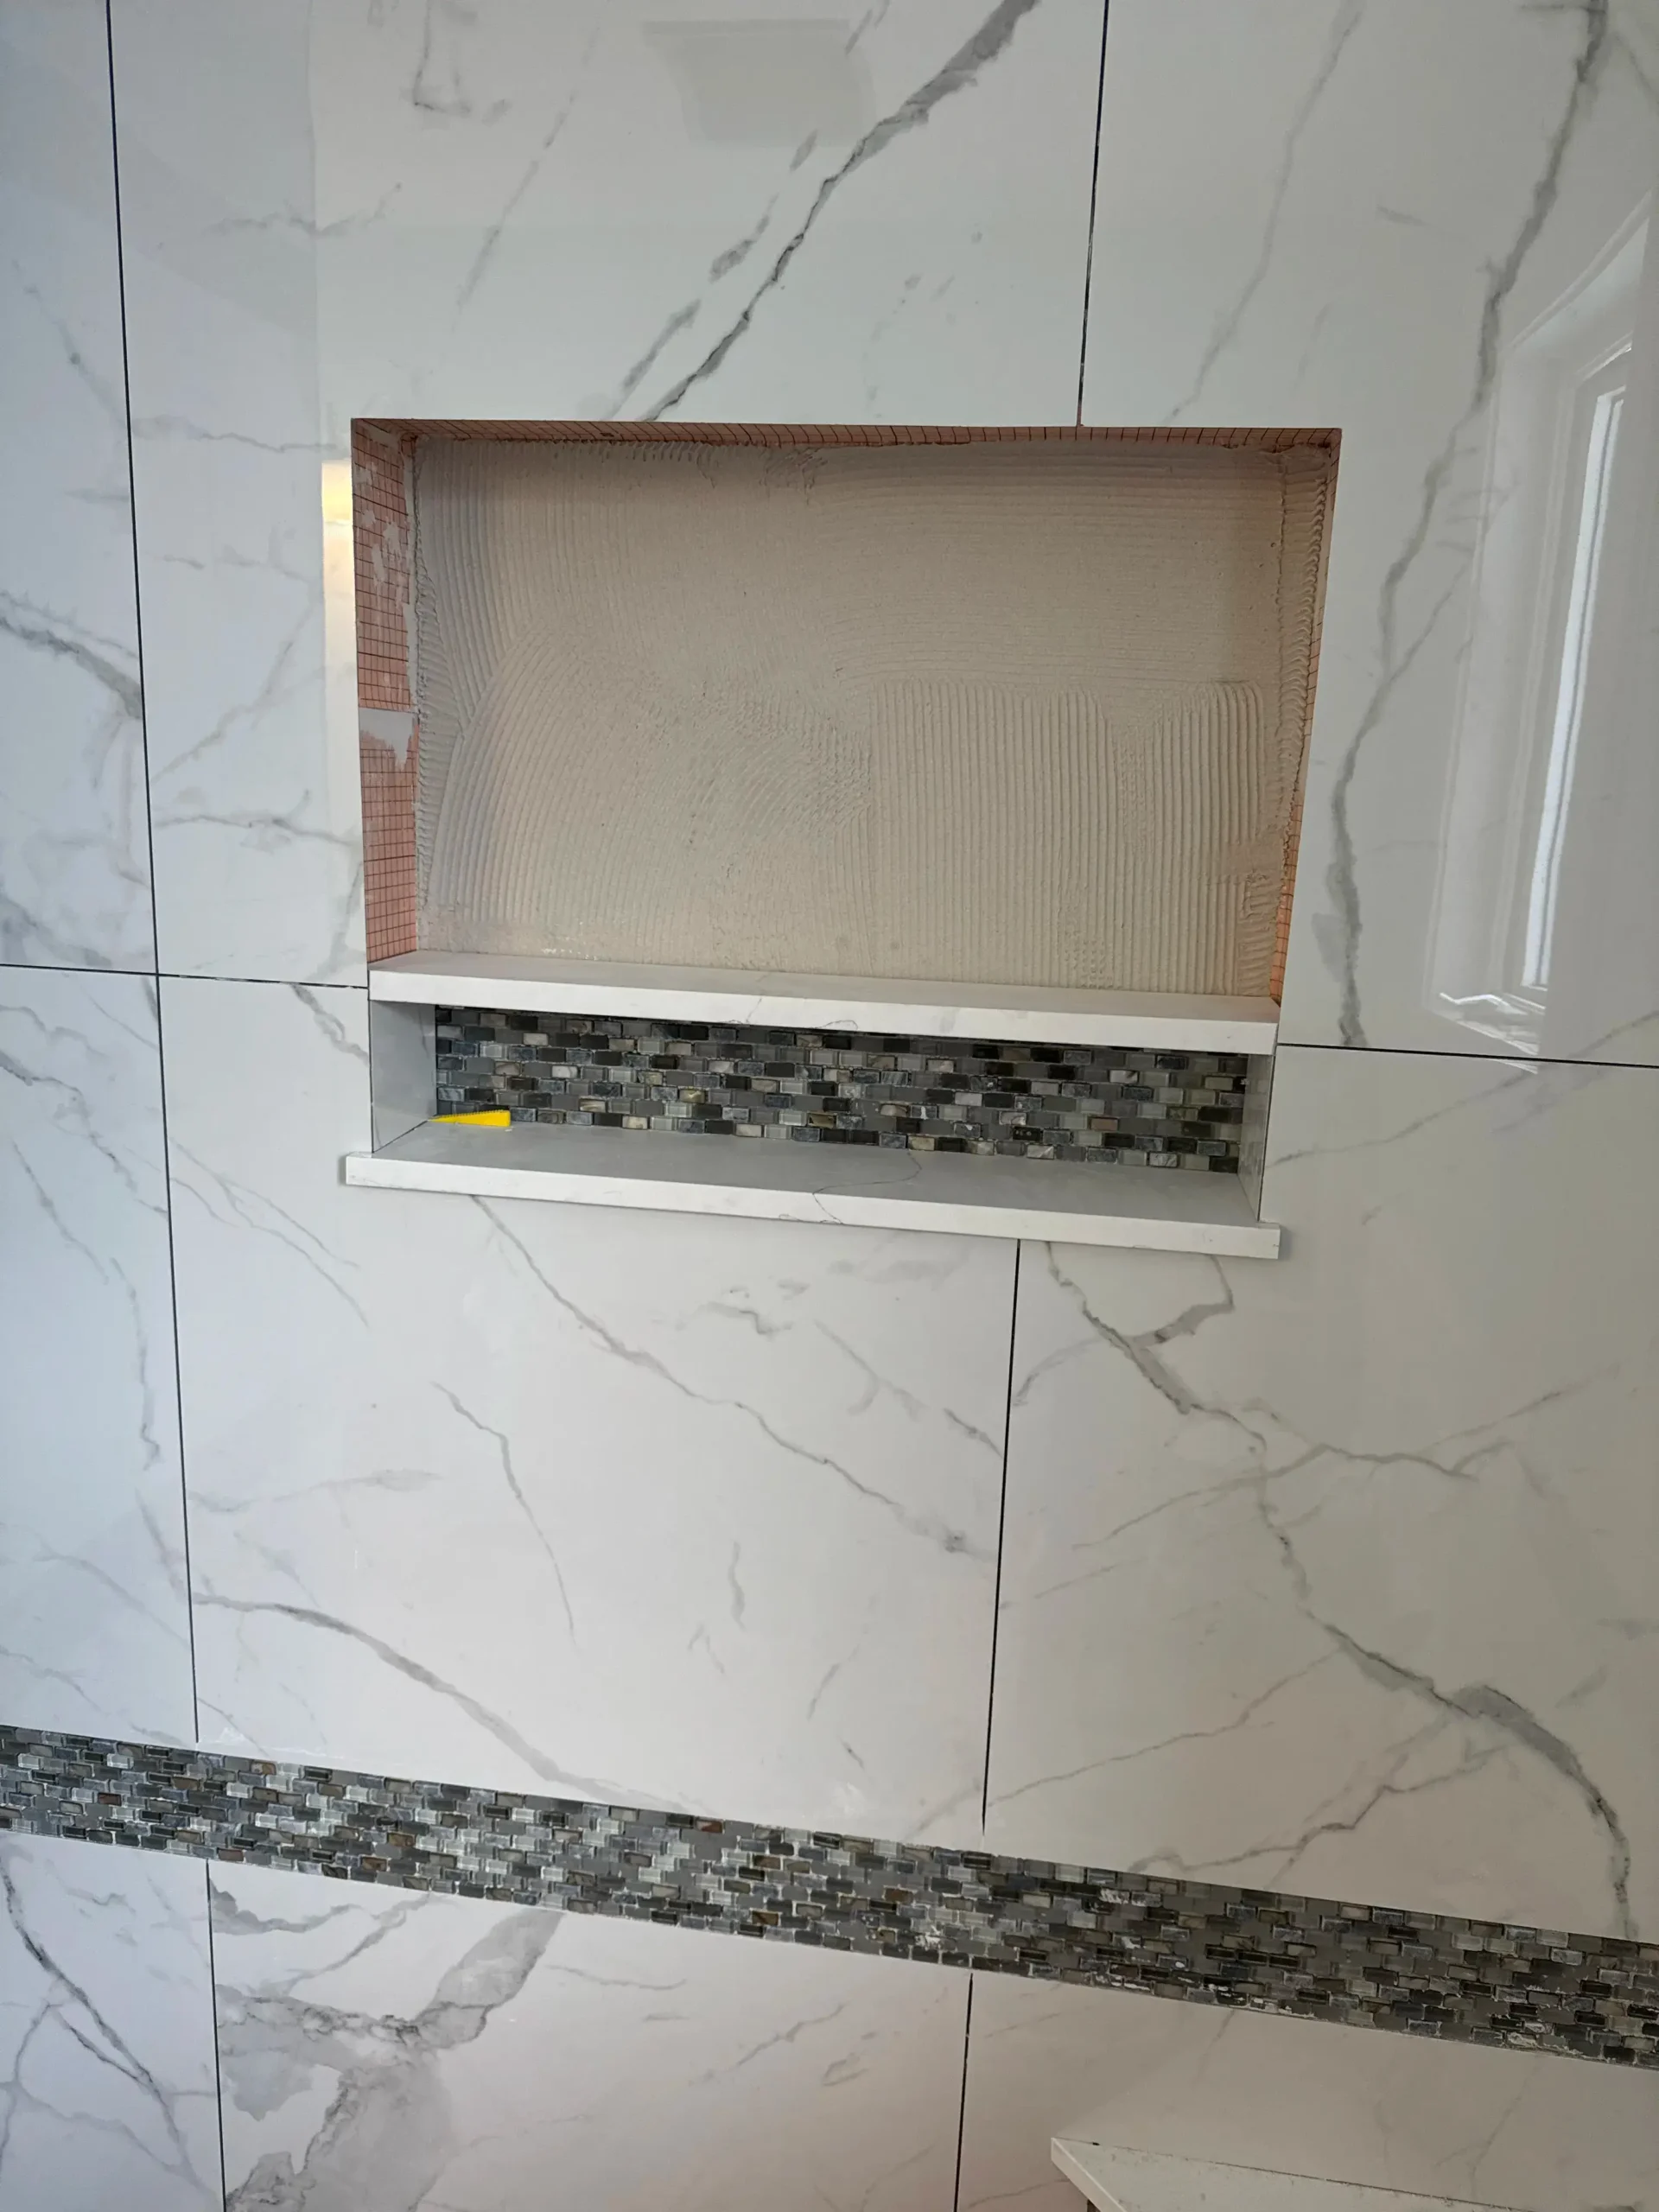
- Shower niches and accents: Built-in shower niches for shampoo and soap should be planned before tiling begins. Accent tile borders or mosaic strips add a custom, high-end look without a huge price increase.
- Grout selection: Epoxy grout is more expensive but doesn’t stain, doesn’t need sealing, and lasts much longer than standard cement grout. It’s a worthwhile upgrade, especially in showers.
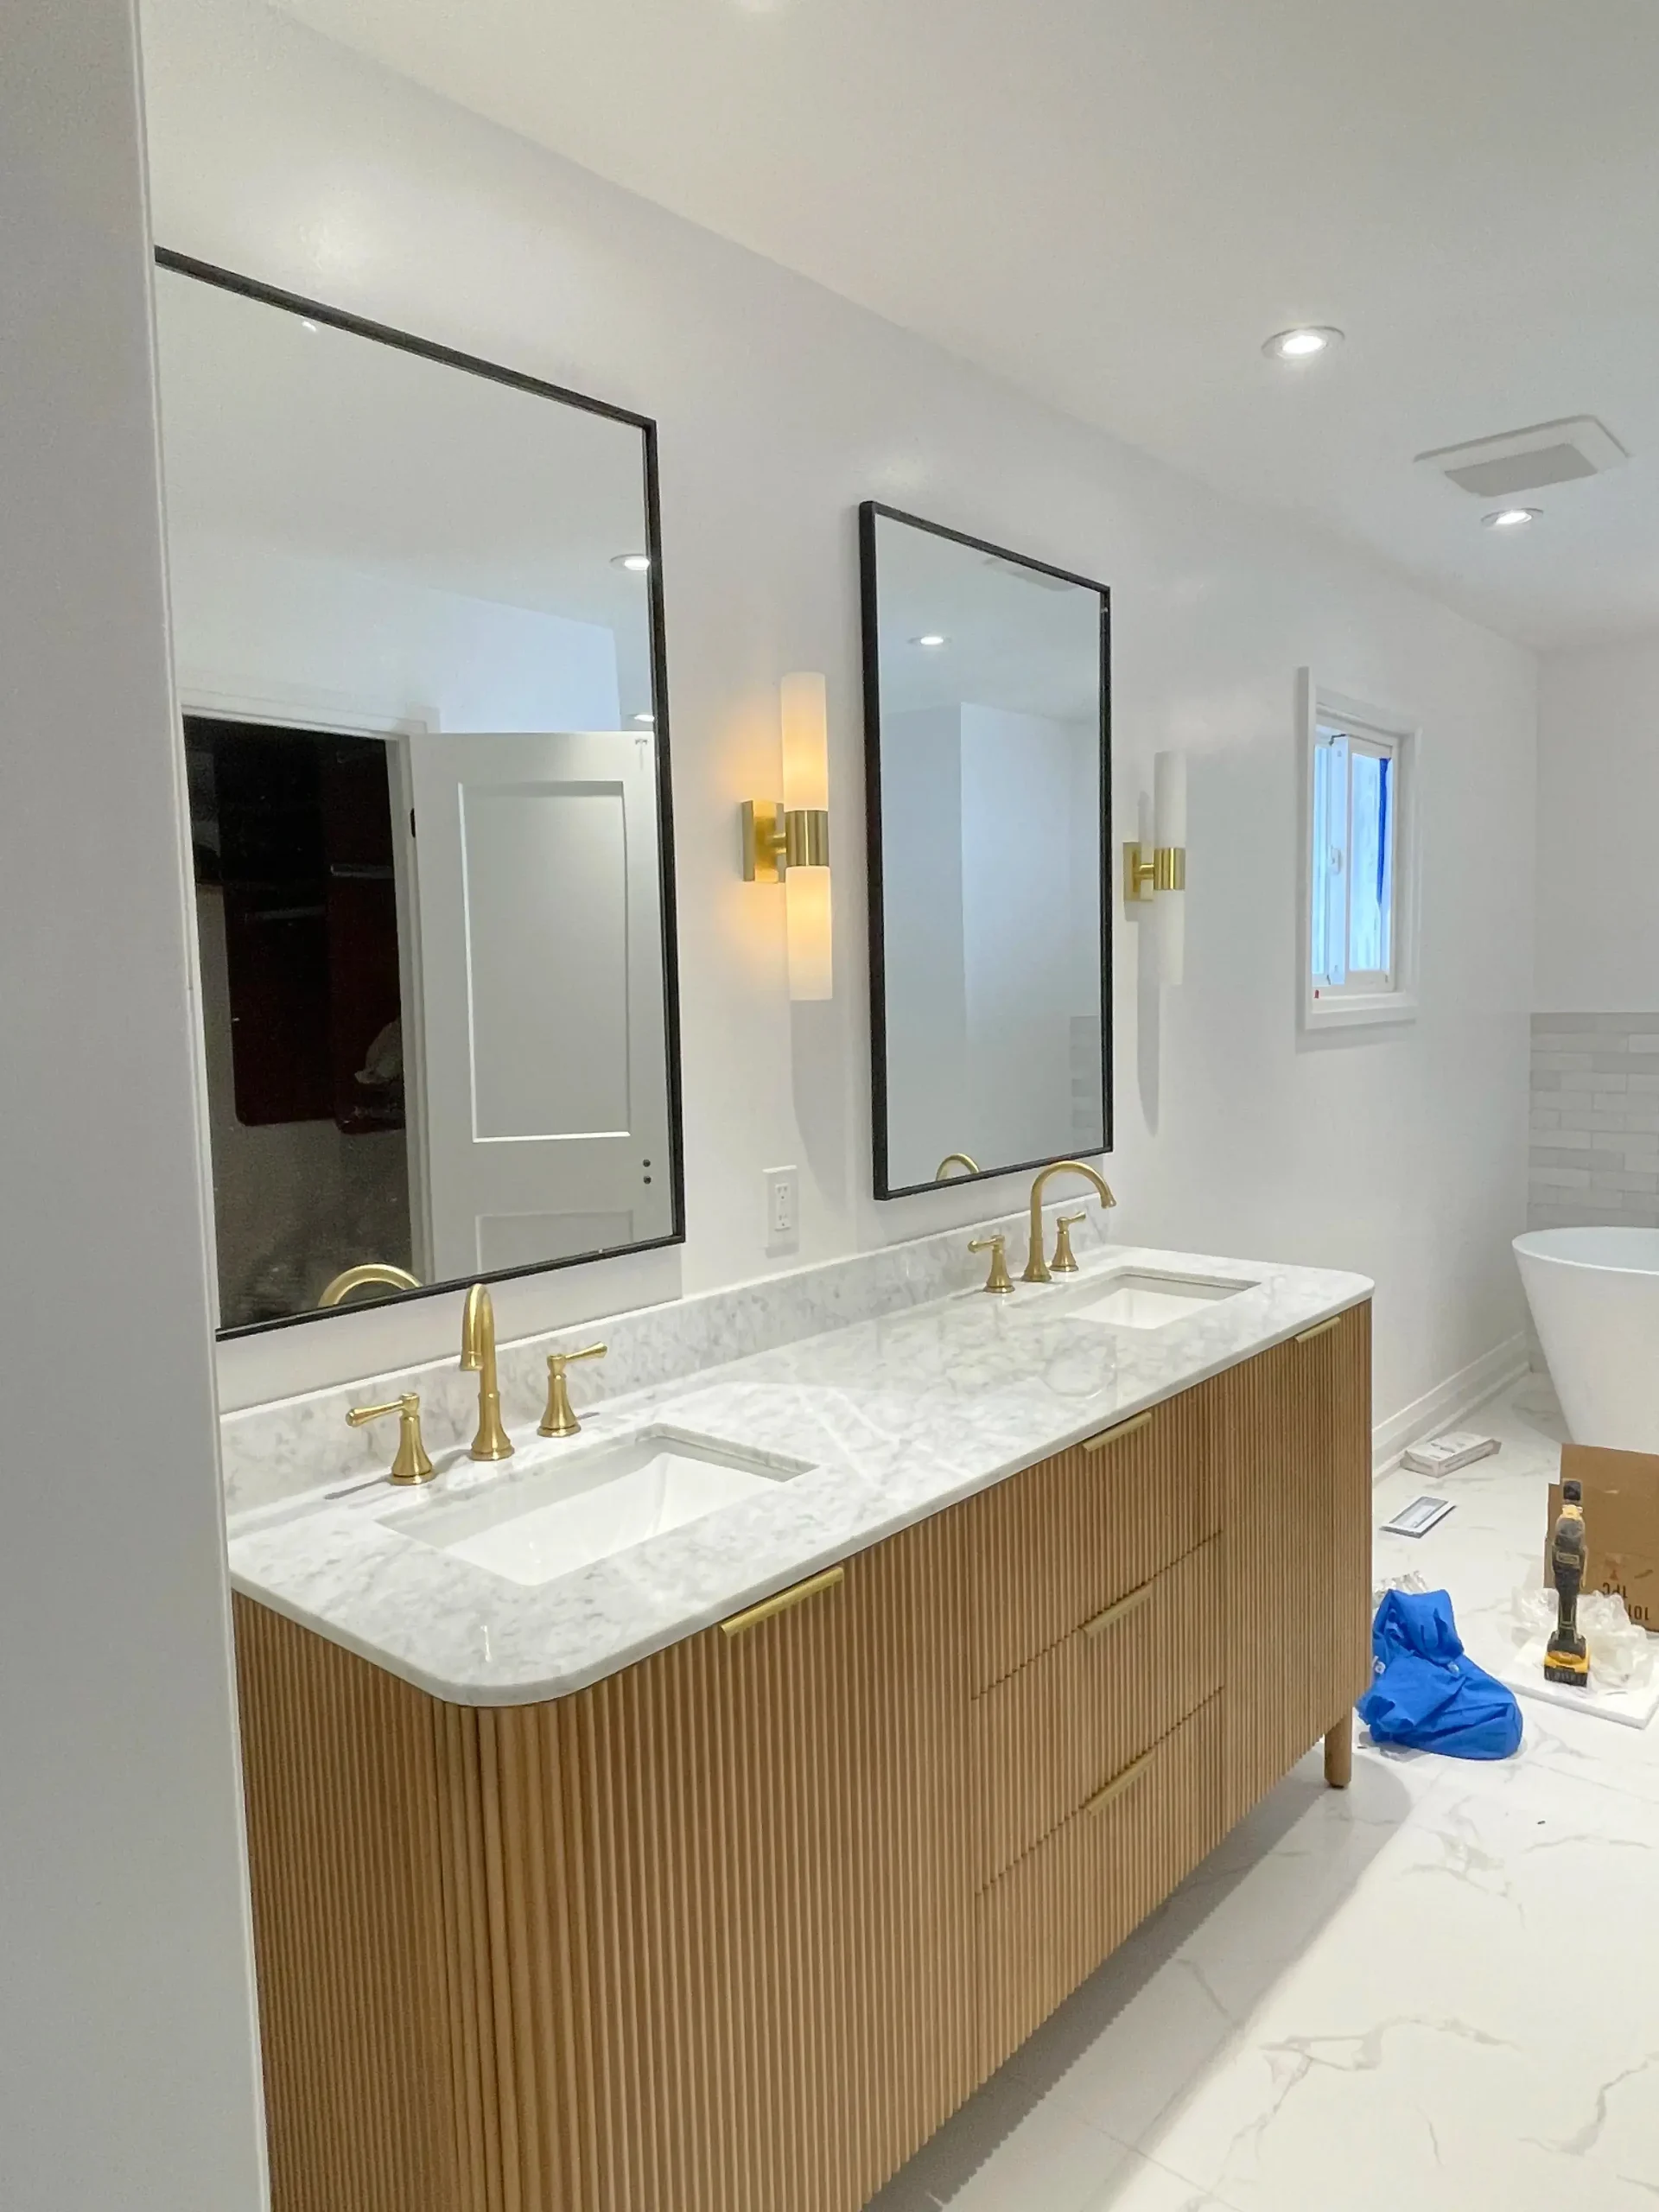
Step 8: Fixture Installation and Finishing
With the tile complete, it’s time for the finishing touches that bring your bathroom together:
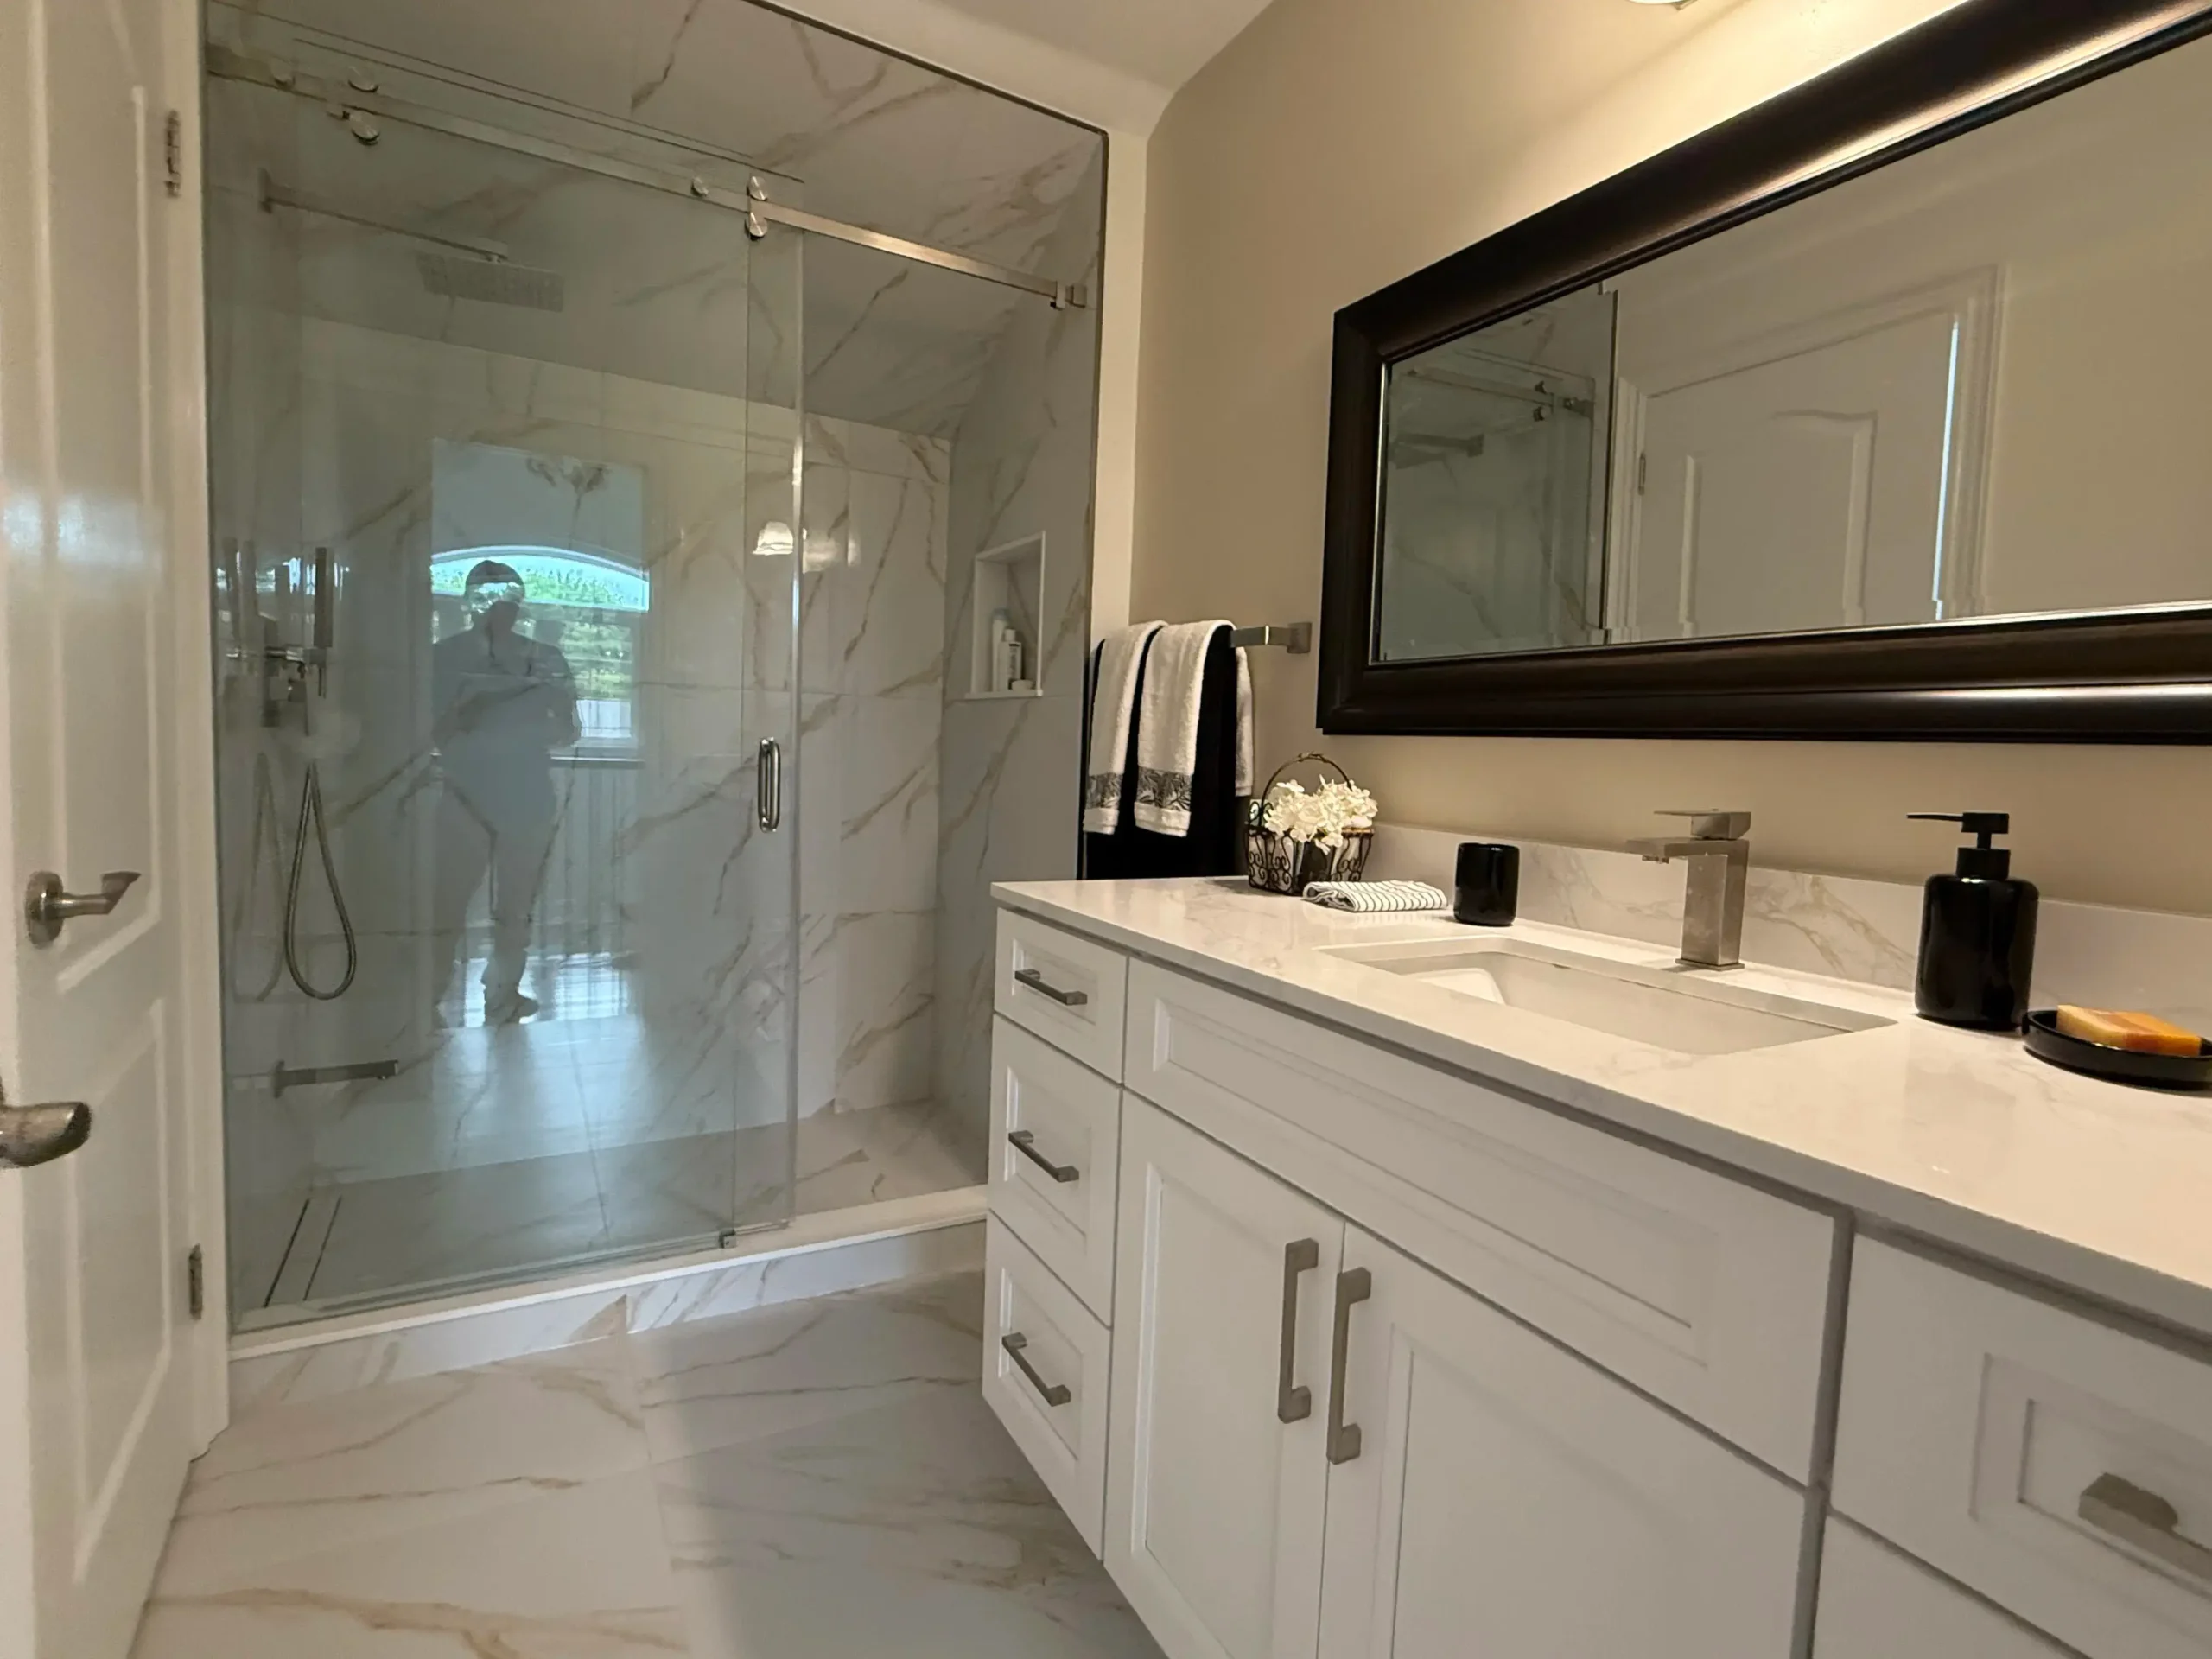
- Vanity and countertop: The vanity gets secured to the wall, the countertop is placed, and the sink and faucet are connected.
- Toilet: Set on a new wax ring or wax-free seal over the flange.
- Shower fixtures: The trim plate, showerhead, handheld, and any body jets are installed and tested for leaks.
- Glass shower enclosure: Measured after tile is complete and installed by a glass specialist.
- Mirror, lighting, and accessories: Towel bars, toilet paper holder, robe hooks, and the vanity mirror go in last.
- Paint and caulking: Walls and ceiling get a fresh coat of bathroom-grade paint, and silicone caulk is applied at all tile-to-tub, tile-to-floor, and tile-to-fixture transitions.
Step 9: Final Inspection and Walkthrough
A professional contractor will do a final walkthrough with you before calling the project complete. This is your opportunity to check every detail: test the water pressure, open and close all drawers, inspect the grout lines, and make sure everything looks and functions the way you expected.
At Bathroom Renos, we don’t consider a project finished until our client is completely satisfied. We also provide a written warranty on every renovation we complete.
How Long Does the Whole Process Take?
From the first phone call to the final walkthrough, here’s a rough timeline for a typical Toronto bathroom renovation:
- Planning and quoting: 1 to 2 weeks
- Material selection and ordering: 2 to 6 weeks (depending on availability)
- Demolition through completion: 10 to 15 business days for a standard full renovation
The total process from first contact to finished bathroom usually takes 6 to 10 weeks. The biggest variable is material lead time, which is why we encourage clients to select and order materials as early as possible.
Common Mistakes to Avoid When Renovating a Bathroom
- Starting demo before materials arrive. This is the number one cause of project delays. Don’t tear out your only bathroom until everything you need is on-site or confirmed for delivery.
- Choosing the cheapest quote. A low price often means corners are being cut, whether it’s skipping waterproofing, using unlicensed trades, or installing materials improperly. The cheapest renovation today can become the most expensive one in two years.
- Ignoring ventilation. A proper exhaust fan (vented to the exterior, not into the attic) is essential for preventing moisture buildup and mould growth. If your current fan is noisy, weak, or vents into the attic, your renovation is the perfect time to upgrade.
- Forgetting about storage. A beautiful bathroom that has nowhere to store towels, toiletries, and cleaning supplies isn’t functional. Plan for a medicine cabinet, vanity with drawers, or recessed shelving.
- Not planning for the toilet during renovation. If you only have one bathroom, ask your contractor about timing. Some projects can be phased so the toilet is available during most of the renovation.
Frequently Asked Questions
What is the first thing to do when renovating a bathroom?
The first step is setting a realistic budget. Once you know what you can spend, you can start making decisions about layout, materials, and fixtures. Trying to plan a renovation without a clear budget leads to overspending, indecision, and costly change orders.
Should I renovate my bathroom myself or hire a contractor?
Unless you have experience with plumbing, electrical, waterproofing, and tile installation, hiring a professional is strongly recommended. A poorly done DIY bathroom can lead to water damage, mould, and code violations that cost far more to fix than the original renovation would have cost. In Ontario, plumbing and electrical work must be done by licensed tradespeople by law.
How do I choose between a bathtub and a walk-in shower?
Consider how you actually use the space. If no one in the household takes baths regularly, a walk-in shower is a better use of the space and gives the bathroom a more open, modern feel. However, if you have young children or plan to sell the home soon, having at least one bathtub in the house is generally recommended.
What order should a bathroom renovation follow?
The typical order is: demolition, plumbing rough-in, electrical rough-in, backer board, waterproofing, tile installation, vanity and fixture installation, glass enclosure, painting, and final accessories. Each step builds on the previous one, so skipping or rushing any stage can cause problems down the line.
How much does a full bathroom renovation cost in Toronto?
In 2026, a full bathroom renovation in Toronto typically costs between $15,000 and $35,000, depending on the size of the bathroom, the materials you choose, and whether plumbing or electrical changes are needed. You can read our complete cost guide for a detailed breakdown.
Can I live in my home during a bathroom renovation?
Yes, most homeowners stay in their home during the renovation. If you have a second bathroom, there’s very little disruption to your daily routine. If the bathroom being renovated is your only one, talk to your contractor about scheduling so you have access to the toilet as much as possible during the project.
Ready to Start Your Bathroom Renovation?
The best time to start planning is right now. At Bathroom Renos, we specialize exclusively in bathroom renovations across the Greater Toronto Area. We handle everything from initial design consultation through to the final walkthrough, and every quote we provide is detailed, written, and all-inclusive.
Request your free quote today and let’s turn your outdated bathroom into the space you’ve been imagining.
Or call us directly at 416-220-6423 to get started.